What Do You Do After Entry?Let’s keep it simple.
You found the setup.
You sized it right.
You entered.
Now what?
This is where most traders fail
Before the trade… everything is clear.
After entry?
Emotions take over.
• you close early
• you move stops
• you change your plan
And the trade becomes something else.
The missing piece
Most traders plan the entry.
Very few plan what happens next.
But that’s where the real money is made… or lost.
What should be clear
Before entering, you should already know:
• Do I hold to target?
• Do I take partials?
• Do I move to breakeven?
If you don’t know this…
You’ll improvise.
And improvisation is expensive
Because decisions made during the trade…
Are emotional.
Not logical.
Trading doesn’t end at entry.
That’s where it starts.
⚠️ Disclaimer: This is not financial advice. Always do your own research and manage risk properly.
📚 Stick to your trading plan regarding entries, risk, and management.
Good luck! 🍀
All Strategies Are Good; If Managed Properly!
~Richard Nasr
Community ideas

The Market Is Lying to you, be careful Bitcoin has been going up lately and even reached the mid-70K range, which on the surface looks strong. But trading volume is surprisingly low, and that makes the move feel less solid than it seems. When price goes up without strong participation, it often means the market could suddenly turn. Because of this, many traders are staying careful and watching closely for any sign of reversal.
At the same time, the US Federal Reserve decided to keep interest rates unchanged, which has created uncertainty in both crypto and forex markets. Traders are now unsure whether tighter policy is coming or if rate cuts will happen later, and this is causing more ups and downs in currencies like the euro and pound. On top of that, a big crypto-related money laundering case involving hundreds of millions of dollars has added more fear about possible stricter regulations. All of this together is making the market feel calm on the outside, but unstable underneath.
In such conditions, many traders rely on platforms like TradingView to monitor real-time charts, volume changes, and key technical levels more closely. Tools like indicators, alerts, and market structure analysis help them react faster to sudden shifts in sentiment. Still, even with advanced tools, uncertainty remains high and disciplined risk management is more important than ever.
Short Ethereum analysis:
BINANCE:ETHUSDT is again in the Ascending channel and seems it is starting new trend to the upside I can see at least 6% gain toward 2400$ it is nothing for the beginning.
Need a little love!
We pour love into every post your support keeps us inspired! Don’t be shy, we’d love to hear from you on comments. Big thanks

Crypto World Not Trump world or specific ones Introduction – The Scale of Today's Crypto Market
The cryptocurrency market has matured significantly. With a total market capitalization of approximately $2.5 trillion and consistently high trading volume, it is no longer a niche asset class that can be easily moved by individual interests. This is a crucial point that every trader must understand.
Individual Interests vs. Market Purpose
Individuals such as Donald Trump, his affiliates, or even Elon Musk – despite their wealth and public influence – do not define the purpose or direction of the crypto market. Their total assets are minuscule compared to the $2.5 trillion market cap. In relative terms, they are like insects trying to move an elephant . They cannot sustainably push the market up or down with real or fake news.
Historical Parallel – Elon Musk and Dogecoin
This behavior is not new. In previous years, Elon Musk used his Twitter (now X) influence to pump and dump Dogecoin (DOGE) for his own interests. His tweets caused sharp price movements, but those effects were temporary . Over time, the market learned to ignore or quickly fade such news. The power of his influence diminished with each tweet.
Current Case – Trump and the Crypto Market
Now, similar behavior is observed from Trump and his circle. However, there is a critical difference: the market is now even larger and more liquid. Each time Trump tweets about crypto, his power to move the market decreases – just like what happened with Elon Musk.
The Real Problem – Insider Activity and Retail Losses
What is more concerning is the observable pattern of anonymous whale wallets opening massive, strong positions before Trump's tweets are published on social media. These wallets appear to have advanced knowledge of the news.
As a result:
Retail traders rush in after seeing the news, driven by FOMO (fear of missing out).
These retail traders get rekt (liquidated) when the price reverses shortly after.
Meanwhile, the anonymous whales close their positions at a profit, using retail liquidity as their exit.
This is a classic "buy the rumor, sell the news" pattern, but with an extra layer of insider advantage.
Why Their Power Is Decreasing
Two main reasons:
Market Cap Difference – Their total assets are too small relative to the $2.5 trillion crypto market. They cannot sustain a directional move.
Trader Adaptation – Traders who rush into positions based on celebrity or political news are repeatedly getting liquidated. Over time, the market learns. Fewer traders react, and those who do lose capital and stop.
What Should You Do?
This is the most important part of this educational post:
1.Turn off your trading setup whenever such individuals post something that can shake the market.
2.Do nothing – Avoid the temptation to chase the news.
3.Understand the real game – The profit belongs to those who open their high-volume positions 4.After the news is released. They need your liquidity to close their positions with profit.
Stay away from news-driven volatility.
5.Stick to your own trading plan – Do not let external noise dictate your entries and exits. Your 6.plan, based on your analysis and risk tolerance, is your only reliable guide.
Final Educational Takeaway
The crypto market is now too large for any single individual or family to control. Each tweet or news event loses power over time. The ones who profit are the anonymous whales who position themselves before the news. The ones who lose are retail traders who react emotionally. Protect your capital: ignore the noise, follow your plan.
Lyft at Support Confluence – Educational BreakdownHello Friends, Welcome to RK_Chaarts,
Today, we’re taking a look at the chart of LYFT, which is a great example of how multiple technical signals can align on a single chart. This is purely for Educational purposes.
Lyft is sitting at a technically very interesting area. Where Elliott waves are suggesting Impulse ahead, Supporting by Hidden Bullish Divergence at same area, which increases probability of bounce from current levels and Volume profile is also suggesting POC as a support below current levels which is again a good sign for same bias. Elliott Wave structure, Volume Profile support, and Hidden Bullish Divergence across multiple timeframes are all converging toward the same conclusion, with Invalidation level as per Elliott Wave theory is 12.46, the next major move could be up, and it could be significant.
Lets check them one by one
Elliott Wave Structure:
From the bottom of May 2023, which is life time low as per today, We have started impulse counts from there, Wave (1) rallied from $7.85 to the $20.85 which is Top of March 2024 in a clean 5-wave structure. A complex W-X-Y correction followed as Wave (2), dragged down to $9 – $10 which is Low of April 2025. Again followed by Wave (3) which made significant high of $ 25.54 which is Top of Nov 2025, and then followed by corrective wave (4) dragged down by 12.46 which is Low of March 2026. Now possibly we have started unfolding wave (5) upwards, which should go beyond high of wave (3) as per Elliott Wave theory. If our counts are going to be right, then low of wave (4) should not to be break, as per theory, so now we can say Invalidation level is $ 12.45 of this view.
Volume Profile : Confirming the Support Zone
The Volume Profile measured from the November 2025 high aligns perfectly with the Elliott Wave count:
$13.30 (POC): The Point of Control. Most trading since the high has occurred here. This is the strongest magnet and support on the chart, as per POC aggressive buyers to defend this level.
$12.47 (VAL): Low point below POC, which is Value area of volume on Lower side, this means Current last Support. Aligning with our Elliott wave Invalidation level.
$19.07 (VAH): First real wall. Trapped sellers from the decline will exit here. A confirmed break above $19 would be a major bullish signal.
Hidden Bullish Divergence on Weekly Timeframe
This is what elevates this setup above an ordinary wave count. Hidden Bullish Divergence (HBD) has been identified on both the Weekly and Hourly timeframes simultaneously.
Hidden Bullish Divergence occurs when price makes a Higher Low but the momentum indicator makes a Lower Low. Unlike regular divergence which signals reversal, HBD signals trend continuation during a pullback, it tells you the underlying trend is still bullish and the current weakness is a buying opportunity, not a breakdown.
When HBD appears on two timeframes as far apart as Weekly and Hourly simultaneously, pointing in the same direction, it is a signal that deserves serious attention. Combined with the Wave (4) completion zone and Volume POC, the technical confluence here is genuinely compelling.
Conclusion:
When Elliott Wave Counts & Structure, Volume support, and Divergence all converge at the same level, it’s more than a single signal setup, it’s confluence. As long as 12.46 holds, the bias favors a significant move higher.
I am not Sebi registered analyst. My studies are for educational purpose only.
Please Consult your financial advisor before trading or investing.
I am not responsible for any kinds of your profits and your losses.
Most investors treat trading as a hobby because they have a full-time job doing something else.
However, If you treat trading like a business, it will pay you like a business.
If you treat like a hobby, hobbies don't pay, they cost you...!
Hope this post is helpful to community
Thanks
RK💕
Disclaimer and Risk Warning.
The analysis and discussion provided on in.tradingview.com is intended for educational purposes only and should not be relied upon for trading decisions. RK_Chaarts is not an investment adviser and the information provided here should not be taken as professional investment advice. Before buying or selling any investments, securities, or precious metals, it is recommended that you conduct your own due diligence. RK_Chaarts does not share in your profits and will not take responsibility for any losses you may incur. So Please Consult your financial advisor before trading or investing.

Why Shorting New Highs / Buying New Lows Usually Hurts First
Most retail traders are trained to think in extremes.
When price makes a new all-time high, they think:
> “Too high. It has to come down.”
When price makes a new low, they think:
> “Too cheap. It has to bounce.”
This sounds logical.
But in trading, “logical” is often where money goes to die.
A new high is not simply “expensive.”
A new low is not simply “cheap.”
A new high or new low is a **battle result**.
Before price reaches that level, the market has already fought through multiple layers of resistance, support, stop orders, trapped positioning, forced hedging, profit-taking, dip-buying, and short-covering.
That price did not arrive there by accident.
It arrived there because one side kept winning.
When price breaks into a new high, bulls have already defeated sellers at prior levels.
When price breaks into a new low, bears have already defeated buyers at prior levels.
So the first rule is simple:
**Respect the winner before you try to fade the winner.**
## New Highs Are Not Automatic Shorts
A stock hitting a new high feels emotionally uncomfortable.
You look at the chart and think:
“This is stretched.”
Maybe it is.
But stretched can become more stretched.
Overbought can become violently overbought.
A breakout can turn into a short squeeze.
A new high means sellers tried to stop price and failed. Shorts may be trapped. Momentum buyers may enter. Market makers may need to hedge. Trend followers may pile in. Funds may chase exposure. Algorithms may trigger breakout flows.
That is why shorting a new high often hurts immediately.
You are not shorting weakness.
You are shorting the strongest part of the chart.
You may eventually be right that price is too extended.
But short-term options do not pay you for being eventually right.
They pay you for being right **fast**.
If you buy puts right after a fresh breakout and the market spends the next few hours consolidating near the high, your puts bleed.
If it pushes one more leg higher, your puts get crushed.
If it chops sideways before reversing tomorrow, your 0DTE or 1DTE options may still die even though your macro opinion was correct.
This is the trap:
**You can be right on direction and still lose because your timing is wrong.**
## New Lows Are Not Automatic Buys
The same trap exists on the downside.
A stock hits a new low and traders think:
“This has fallen too much. It has to bounce.”
Maybe.
But a new low means support broke.
Buyers tried to defend the level and failed.
Now longs may be trapped. Stop losses may trigger. Funds may reduce exposure. Momentum sellers may press. Market makers may hedge lower. Panic can accelerate.
Buying calls immediately after a new low is not buying value.
It is buying into a falling knife while the bears still control the tape.
Again, you may eventually be right.
Maybe the stock is oversold.
Maybe the bounce comes later.
Maybe the market does reverse.
But if it takes hours or days to reverse, your short-term calls may already be dead.
This is why “buy the dip” fails so often with options.
The stock can stop falling and your calls still lose.
The stock can bounce slightly and your calls still lose.
The stock can reverse tomorrow and your 0DTE call still goes to zero today.
Options punish early entries.
## Price Levels Are Battlefields
Every important price level is a battlefield.
Support is not just a line.
Resistance is not just a line.
POC, VAL, VAH, prior high, prior low, ATH, ATL, round numbers, gap zones — these are all areas where money fought.
A level becomes meaningful because traders acted there before.
When price breaks through that area, the market is telling you something:
One side just lost.
That does not mean the winner owns the market forever.
But it does mean the loser usually does not instantly regain control.
After a major level breaks, price often needs time to process the new reality.
It may consolidate.
It may retest.
It may continue.
It may squeeze.
It may flush.
But clean instant reversal is not the default.
The crowd thinks:
“New high = short.”
“New low = buy.”
The operator thinks:
“Who just won the battle?”
“Is the winner still pressing?”
“Has the winner started losing control?”
That difference is everything.
## The Real Enemy Is Time
For stock traders, early can be uncomfortable.
For options traders, early can be fatal.
Short-term options are not pure direction bets.
They are direction + speed + timing bets.
This is why fading a new high or new low with 0DTE or 1DTE options is dangerous.
You are fighting three enemies at once:
1. **Momentum**
2. **Time decay**
3. **Delayed reversal**
Even if your reversal thesis is correct, the market may not reverse fast enough.
That is the silent killer.
A trader buys puts at a fresh high.
Price pauses.
The trader thinks, “Good, it stopped going up.”
But the put is bleeding.
Then price makes one more push higher.
The put gets crushed.
Then price finally reverses later.
The trader was “right,” but the option is already damaged.
Same with buying calls at a fresh low.
Price stops falling.
The trader thinks, “Bottom is in.”
But the call is still losing.
Then price chops sideways.
Theta eats the premium.
Then the bounce comes too late.
This is why options require precision.
Not emotional opinions.
## Wait for Exhaustion
If you want to short a new high, wait.
Not forever.
But wait for signs that the breakout is no longer being accepted.
Examples:
Price makes a new high but cannot hold above it.
Breakout candles lose range.
Volume weakens on continuation.
Price breaks back below the breakout level.
The second or third push fails.
Momentum diverges.
The market stops rewarding buyers.
That is when the setup changes.
You are no longer shorting strength.
You are shorting failed strength.
That is a completely different trade.
If you want to buy a new low, same logic.
Do not buy just because it is down.
Wait until sellers start losing control.
Examples:
Price makes a new low but immediately reclaims the breakdown level.
Flush candle gets absorbed.
Follow-through fails.
Lower low does not produce lower momentum.
Buyers defend for multiple candles.
Price returns back inside prior value.
That is when the setup becomes interesting.
You are no longer buying weakness.
You are buying failed weakness.
## Give the Market a Few Days
For bigger moves, the best reversal setups often do not happen immediately.
After a major new high or new low, the market may need a few days to show whether the move is real or exhausted.
This waiting period is not weakness.
It is edge.
Let the market reveal the next episode.
Day one: breakout or breakdown.
Day two: acceptance or rejection.
Day three: continuation or exhaustion.
By then, the chart usually gives better information.
You can rerun the signal.
You can check whether momentum is still valid.
You can see whether the new level is becoming support/resistance or turning into a trap.
This is how you avoid becoming liquidity.
The amateur wants to predict the reversal at the exact top or bottom.
The operator waits for the market to show that the top or bottom is actually forming.
## The Better Framework
Do not ask:
“Is this too high?”
Ask:
“Has the upside auction failed?”
Do not ask:
“Is this too low?”
Ask:
“Has the downside auction failed?”
Do not ask:
“Can I catch the top?”
Ask:
“Are buyers losing control after winning?”
Do not ask:
“Can I catch the bottom?”
Ask:
“Are sellers losing control after winning?”
This is the entire shift.
You stop trading your opinion.
You start trading control.
## Practical Rule for QS Traders
When price breaks into a new high:
**Do not instantly short.**
First assume momentum is real.
Let price consolidate, retest, or exhaust.
Only fade after failed continuation.
When price breaks into a new low:
**Do not instantly buy.**
First assume sellers are in control.
Let price flush, retest, or reclaim.
Only buy after failed breakdown.
For short-term options, this rule matters even more.
Because being early is not neutral.
Being early costs money every minute.
## Final Thought
A new high is not a sell signal.
A new low is not a buy signal.
They are evidence that one side just won a major battle.
The winning side normally gets time.
The market usually consolidates, extends, squeezes, flushes, or digests before reversing.
That waiting period destroys impatient option traders.
So do not fight the winner immediately.
Respect momentum first.
Wait for exhaustion.
Then rerun the signal.
The goal is not to catch the first tick of reversal.
The goal is to enter when the market has already shown that the winner is losing control.
That is where the real trade begins.

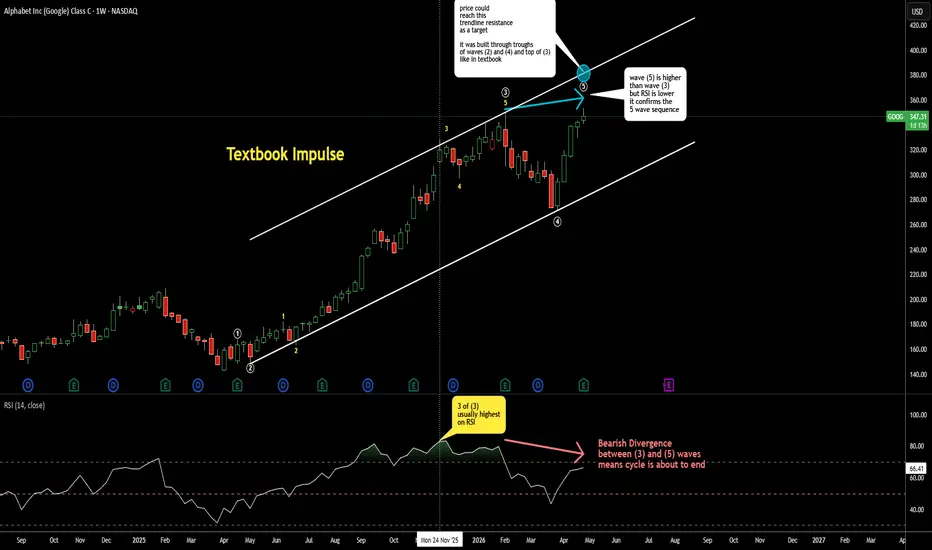
Sample of Classic Bullish ImpulseBeautiful textbook bullish impulse was spotted,
so let me walk you through
We can see bullish 5 waves sequence (white) on the chart
All waves are easily spotted and have clear structure
We have extended wave (3) white that consists of 5 sub-waves
Look at RSI's highest peak on wave 3 yellow of (3) white (vertical line)
it accurately follows the guideline
so you can spot the wave 3 of (3) in the future by finding the highest point on RSI
RSI clearly indicates waves (3) and (5) either
as it didn't print higher top while the wave (5) surpassed the maximum of wave (3)
This is called Bearish Divergence and it is a harbinger of cycle completion
within the current impulse
Another guideline is the trend channel composition
it has been built through 3 points: the troughs of waves (2) and (4) and top of wave (3)
The upside of the channel is the viable target for the wave (5)
Most Traders Improve Their Strategy — Not Their BehaviorHello Traders!
At some point in trading, almost everyone starts looking for a better strategy. Losses happen, confidence drops, and the first instinct is to change something, a new setup, a new indicator, or a completely different system. It feels logical, because improving the strategy should improve results. But over time, one uncomfortable truth becomes clear: most strategies don’t fail because they are bad… they fail because of how they are executed. The real problem is not what you trade, it’s how you behave while trading.
Why Traders Keep Changing Strategies
When things don’t work, changing the system feels like the right move.
A few losses create doubt , making traders question the entire strategy too quickly
Expecting instant consistency leads to frustration when results don’t come fast
Searching for perfection instead of building discipline creates constant switching
This creates a cycle.
New strategy → short-term hope → losses → switch again.
The Real Problem: Behavior
Even a good strategy can fail with poor execution.
Entering trades early without confirmation, just because the setup “looks close”
Exiting winning trades too soon due to fear, instead of following the plan
Holding losing trades longer, hoping the market will reverse
Taking extra trades out of boredom or emotional pressure
The system stays the same, But behavior changes everything.
Why Good Strategies Still Fail
A strategy works on charts but Execution happens in real time.
Fear causes early exits, cutting potential profits
Greed leads to overtrading or holding beyond targets
Frustration pushes traders into revenge trading
The system doesn’t fail. Emotional decisions break it.
What Actually Improves Results
The shift comes when you stop chasing new systems and start fixing execution.
Following the same process repeatedly instead of constantly changing approaches
Taking trades only when conditions are fully met, not partially
Accepting losses as part of the system instead of reacting emotionally
Consistency doesn’t come from better strategies. It comes from better control.
Rahul’s Tip
Before changing your strategy, ask yourself:
Are you actually following your current one properly?
Most of the time, improvement doesn’t come from adding more.
It comes from controlling what you already have.
If this helped, drop a like or share your thoughts in the comments.
More real, experience-based insights coming.
— @TraderRahulPal
SCA Registered Financial Influencer (Dubai, UAE)

iFVG Fractal Alignment ModelThis tutorial breaks down the iFVG Fractal Alignment Model — a multi-timeframe approach that uses Inverse Fair Value Gaps as the core building block for identifying when higher timeframe and lower timeframe structure are in agreement.
The concept is rooted in the fractal nature of price delivery. The same patterns that form on higher timeframes also form on lower timeframes. This model uses that principle by first identifying an IFVG model on the higher timeframe, then dropping to a paired lower timeframe and waiting for the same directional IFVG model to appear within the higher timeframe context before considering any involvement.
What Is an Inverse Fair Value Gap (IFVG)
A Fair Value Gap (FVG) is a three-candle imbalance where the wick of candle 1 and the wick of candle 3 do not overlap, leaving a gap in price delivery around candle 2. This gap represents an area where one side of the market (buyers or sellers) was dominant and the other side was not adequately represented.
An Inverse Fair Value Gap (IFVG) forms when an existing FVG is invalidated. Invalidation occurs when a candle body fully trades through the original FVG range. At that point, the FVG's directional bias is considered to have failed, and the zone flips — a bullish FVG that gets invalidated becomes a bearish IFVG, and a bearish FVG that gets invalidated becomes a bullish IFVG. The IFVG retains the same price boundaries as the original FVG but carries the opposite directional bias.
The significance of an IFVG is that it represents a shift in who is in control of that price range. The original imbalance was overcome, and the zone now serves as a reference for the new directional bias.
The Fractal Alignment Concept
Price structure is fractal — the same formations that appear on a weekly chart also appear on a 5-minute chart. An IFVG model on a 1-hour chart is structurally identical to an IFVG model on a 1-minute chart. The difference is scale and significance.
The Fractal Alignment Model uses this property by layering two timeframes together:
Step 1 — Identify an IFVG model on the higher timeframe. This establishes the directional context. A bullish IFVG model on the higher timeframe means you are looking for bullish continuation on the lower timeframe. A bearish IFVG model means you are looking for bearish continuation.
Step 2 — Drop to the paired lower timeframe. Within the price range and time window of the higher timeframe IFVG model, wait for the same directional IFVG model to form on the lower timeframe. This is the fractal alignment — the lower timeframe is confirming the same structural shift that the higher timeframe has already shown.
Step 3 — The lower timeframe IFVG model appearing within the context of the higher timeframe IFVG model represents both timeframes being in agreement. The higher timeframe provides the directional bias, and the lower timeframe provides the timing and precision.
The key discipline is waiting for alignment. A higher timeframe IFVG model on its own establishes context but not timing. A lower timeframe IFVG model on its own lacks the broader directional backing. The model requires both to be present and directionally aligned before the setup is considered complete.
Timeframe Pairing
For the fractal alignment to work, the two timeframes need to be appropriately spaced. If they are too close together, the lower timeframe is essentially showing the same information as the higher timeframe. If they are too far apart, the lower timeframe structure may not meaningfully relate to the higher timeframe context.
The following pairings represent timeframe relationships where the lower timeframe provides enough granularity to identify the fractal model within the higher timeframe structure:
15-second to 45-second charts pair with the 5-minute timeframe
1-minute to 2-minute charts pair with the 15-minute timeframe
3-minute to 4-minute charts pair with the 30-minute timeframe
5-minute to 10-minute charts pair with the 1-hour timeframe
15-minute charts pair with the 4-hour timeframe
1-hour to 4-hour charts pair with the daily timeframe
Daily charts pair with the weekly timeframe
Weekly charts pair with the monthly timeframe
The lower timeframe in each pair is where you are viewing price action and looking for the confirming IFVG model. The higher timeframe in each pair is where you first identify the directional IFVG context. You are always working from higher to lower — context first, then confirmation.
Reading the Model on the Chart
The attached chart illustrates the model in two stages.
On the left side, a higher timeframe IFVG model is shown. An FVG forms and is subsequently invalidated by a candle body trading through it, creating the IFVG. This establishes the directional bias on the higher timeframe.
On the right side, the same price action is viewed on the paired lower timeframe. Within the context of the higher timeframe IFVG, a lower timeframe IFVG model forms in the same direction. The circled area highlights where the lower timeframe fractal confirms the higher timeframe structure.
The bottom portion of the chart shows the continuation that follows once both timeframes are aligned. The lower timeframe IFVG model inside the higher timeframe IFVG context completes the fractal alignment, and price delivers in the direction both timeframes agree on.
Key Points
Directional agreement is required. The higher timeframe IFVG and the lower timeframe IFVG must share the same directional bias. A bullish higher timeframe IFVG paired with a bearish lower timeframe IFVG is not alignment — it is conflict.
Context comes first. Always start with the higher timeframe. Identify the IFVG model, note the directional bias, and only then move to the lower timeframe to look for confirmation.
Patience is the filter. The model requires you to wait for the lower timeframe to produce its own IFVG model within the higher timeframe context. If the lower timeframe does not produce the confirming structure, there is no setup. Not every higher timeframe IFVG will produce a lower timeframe fractal confirmation.
The IFVG boundaries matter. On the higher timeframe, the IFVG zone (the original FVG price range with flipped bias) is the area of interest. The lower timeframe confirmation should occur within or in proximity to this zone for the alignment to be contextually relevant.
Invalidation uses candle bodies. An FVG is invalidated when a candle body (not just a wick) fully trades through the FVG range. This is what triggers the conversion to an IFVG. Wick penetration alone does not invalidate the original FVG.
What This Model Is Not
This is not a standalone entry method with fixed rules for stop placement or position sizing. It is a structural alignment framework — a way of reading multi-timeframe price delivery through the lens of IFVG formation and invalidation.
The model identifies when two timeframes are showing the same structural shift. How you choose to act on that alignment — entry technique, risk management, and trade management — is a separate decision that depends on your own approach and risk tolerance.
This tutorial is provided for educational purposes. It describes a way of interpreting price structure across timeframes using publicly available concepts. It does not guarantee any specific outcome.
Risk Disclosure
This publication is educational content only. It does not provide financial advice, trade signals, entry/exit recommendations, or any form of investment guidance. The concepts, models, and timeframe pairings described are analytical frameworks for interpreting price structure and are presented for educational purposes only.
Trading financial markets involves substantial risk of loss. Past price behavior does not guarantee future results. Inverse Fair Value Gaps, fractal alignment, and multi-timeframe analysis are interpretive concepts — they do not represent guaranteed support, resistance, reversal points, or directional outcomes.
You are solely responsible for your own trading decisions. No model, framework, or methodology can eliminate the inherent risk of trading. You should never trade with capital you cannot afford to lose. Always conduct your own due diligence and consider consulting a licensed financial professional before making any trading or investment decisions.
By reading this publication, you acknowledge that the author is not responsible for any financial losses or damages resulting from the application of these concepts. This content is provided "as is" for educational and analytical purposes only.

If Your Edge Needs a Paragraph, You Don’t Have One.Most traders can describe their process.
Fewer can describe their edge.
There is a difference.
“I trade order blocks” is not an edge. “I trade breakouts” is not an edge. “I use liquidity, structure, and confirmation” is not an edge either. Those are ingredients. They do not explain why the trade should have positive expectancy.
An edge should survive one sentence.
It should say what you trade, under which condition, and why that condition creates an imbalance. If the explanation needs ten exceptions, five indicators, and a long story about how the chart “looked clean,” the edge is probably not clear yet.
This matters because unclear edges are impossible to review. When a trade wins, you call it discipline. When it loses, you call it bad luck. But without a precise definition, you cannot know whether you followed a system or simply found a reason to enter.
A clear edge is not a slogan. It is a filter.
It tells you what belongs in your playbook and, more importantly, what does not.
Most traders do not lose because they lack information. They lose because their process is too vague to judge.
If your edge cannot be reduced to one clear sentence, it is probably still a feeling.

Trading Big Tech Earnings Week: What Actually MattersFive of the Magnificent Seven - Microsoft, Alphabet, Amazon, Meta Platforms, and Apple - report earnings this week, putting a large part of the market under the spotlight.
These releases often bring sharp moves and can shape sentiment heading into the summer, but for traders, the numbers themselves are rarely the edge. What matters is how price reacts once they’re out, and having a simple framework to interpret that reaction can help frame how to approach the reaction.
Why earnings weeks feel different
Earnings introduce a layer of uncertainty that changes how markets move. Price is no longer driven purely by trend or structure, but by how expectations compare to reality. That often leads to gaps, sharper moves, and more erratic behaviour, even when the broader trend remains intact.
This is particularly true for large-cap tech stocks. With so much focus on AI, growth, and forward guidance, expectations are often elevated heading into the release. That raises the bar for a positive reaction. Strong results do not necessarily lead to sustained upside if that optimism is already reflected in price, while any disappointment can trigger a sharper move as positioning adjusts.
That dynamic is what creates opportunity, but it is also where many traders get caught out.
The move is not the message
One of the most common mistakes during earnings season is to treat the initial move as confirmation. A stock gaps higher, and the instinct is to chase strength. It gaps lower, and the temptation is to react immediately.
In reality, the first move is often just a reaction to the headline.
What matters more is what happens next. Does price hold the gap and build on it, or does it begin to fade? Does early strength lead to continuation, or does it get sold into as the session develops? That secondary behaviour is where the real information sits.
A strong reaction that holds tends to reflect genuine demand. A move that quickly reverses suggests the initial positioning was wrong. Both scenarios can present opportunity, but only if the focus remains on behaviour rather than the release itself.
A simple framework to stay out of trouble
Earnings weeks do not require a new strategy, but they do demand a more disciplined approach. In practice, there are a few principles that can help keep things consistent.
• Define your timeframe before the event
If you are planning to day trade, treat it as such and avoid being pulled into holding positions overnight because the move has gone against you. Equally, if you are positioning for a swing, you need to accept the volatility and gaps that come with that decision. Mixing timeframes is where most mistakes tend to happen.
• Build your plan around levels, not numbers
The earnings release is the catalyst, not the edge. What matters is where price is trading relative to key levels. Support, resistance, and recent structure provide the reference points. The numbers themselves do not.
• Use VWAP as a guide to sentiment
Following a gap, VWAP can help frame whether the move is being accepted. Holding above it suggests buyers are maintaining control, while repeated rejection can point to distribution. It is not a signal in isolation, but it helps contextualise intraday behaviour.
• Avoid chasing the initial move
By the time the market opens, a large part of the reaction has already taken place. Chasing that move often leads to poor entries. Allow price to settle, observe how it behaves, and look for confirmation rather than reacting immediately.
Applying it to Amazon
Looking at Amazon, price has rallied sharply into earnings, trending above the 21-day EMA for the past month with buyers stepping in consistently on shallow pullbacks.
AMZN Daily Candle Chart
Past performance is not a reliable indicator of future results
The November 2025 highs provide a clear reference point. Price broke through that level last week, and recent sessions have seen that breakout area tested. So far, it is holding as support, which, for now, keeps the near-term structure constructive.
With earnings now acting as the catalyst, the focus shifts to how price behaves around that level. A gap higher that holds would suggest continued acceptance of the breakout and reinforce the strength of the trend. If, however, the reaction fades and price slips back below that area, it would point to a failed move and a shift in sentiment.
A gap lower does not automatically imply weakness. The key question is whether buyers step in around the prior highs. If that level holds, the trend remains intact. If it breaks, then the structure begins to change.
Disclaimer: This is for information and learning purposes only. The information provided does not constitute investment advice nor take into account the individual financial circumstances or objectives of any investor. Any information that may be provided relating to past performance is not a reliable indicator of future results or performance. Social media channels are not relevant for UK residents.
Spread bets and CFDs are complex instruments and come with a high risk of losing money rapidly due to leverage. 81.31% of retail investor accounts lose money when trading spread bets and CFDs with this provider. You should consider whether you understand how spread bets and CFDs work and whether you can afford to take the high risk of losing your money.

Risk Management & Regulation Review by WealthThriveXRisk management isn't the boring part of trading. It's what keeps you in the game.
Most new traders obsess over entries — the right indicator, the perfect signal, the next big move. That's fair. Charts are exciting. A well-structured stop-loss plan doesn't exactly go viral with dramatic background music.
But if you want to trade seriously, protection comes before everything else.
Losses are guaranteed. Survival isn't.
Every trader loses trades. That's not a sign you're doing something wrong — it's just how markets work. The real question is whether your account can handle it when the market doesn't agree with you.
That means knowing, before you enter any position: where your stop is, how much you're risking, what your target looks like, and how much you're willing to lose in a day or a week. Without those answers, you're not really trading. You're guessing with money — which is just gambling dressed up with charts.
Size your positions like you expect to be wrong
One of the fastest ways to blow up an account isn't picking the wrong direction. It's risking too much on a single trade. A position that's too large removes your ability to think clearly — suddenly every tick feels like a crisis.
Most experienced traders keep their risk per trade small relative to their total account. The exact percentage varies, but the logic doesn't: no single trade should be able to seriously damage you.
Stop-losses aren't an insult to your analysis
They're a plan B. And in trading, you always need a plan B.
Markets can move hard and fast, especially around news, thin liquidity, or high-volatility sessions. Your stop-loss marks the point where the trade idea is simply no longer valid. The moment you start moving it further away because "price might come back," you've crossed from discipline into hope — and hope isn't a risk management strategy.
The market doesn't issue refunds on that lesson.
Your broker choice is also a risk management decision
This part gets overlooked. Risk isn't only about position size and stop placement — it also lives in who you're trading with.
Before funding an account, it's worth asking: Is the fee structure clear? Are the trading conditions easy to understand? Is there genuine support when something goes wrong? Are risk disclosures actually visible, or buried?
A transparent broker makes those things easy to find. That matters more than most traders realize until it's too late.
A simple pre-trade checklist
Before entering a position, run through these:
Do I know where my stop is?
Do I know exactly how much I'm risking?
Is my position size appropriate for my account?
Am I making this trade based on analysis — or emotion?
Do I understand what the market is doing today?
It won't make every trade a winner. Nothing will. But it will cut down on the impulsive, careless mistakes that compound over time.
Risk management isn't glamorous. It doesn't make for great content. But it's the difference between traders who last and traders who don't.
Survival isn't the boring outcome. It's the whole point.

Trouble Shooting Layout GlitchHello Tradingview
I wanted to make this vide to demonstrate the glitch that is happening with the layout on the platform for me. as you see when the vertical divider is mode to the right the charts on the right are not adjusting their size, they are actually being covered by the chart on the left. This is happening with any layout I choose and is happening on the web-browser version as well as with the desktop version. I am not sure if I mention this on the video but I am on an Imac desktop computer.
Hopefully you guys can help me return to a working layout.
Regards

What Happens When a Pattern FailsMost traders focus on when patterns work, but often the more useful signal comes when
they fail. Using a recent example on the FTSE 100, this video shows how a failed bull flag
breakout can lead to a move in the opposite direction and what that can signal about market
behaviour.

How Day Traders Handle Losses — A Loss with OmarIf you think great traders win more often…
you’re looking at the wrong thing.
In reality, they’re not different from you in how often they win.
They’re different in one thing only: how they lose.
And that’s the perspective most traders completely overlook.
🔥 1. Loss is not the problem — your reaction is
The market doesn’t reward you for predicting direction.
It rewards you for how you manage risk when you’re wrong.
Many traders have perfect entries, clean structure…
yet still lose big because of one decision: not exiting when the trade is wrong.
👉 Losses are normal.
👉 Losing control is what kills accounts.
⚡ 2. Two reactions — two completely different outcomes
When a trade goes against you:
Emotional:
Hope → move stop loss → hold the trade
→ A small loss turns into a big one
Professional:
Accept being wrong → cut the loss as planned
→ Protect both capital and mindset
👉 It’s not a different market
👉 It’s a different reaction
🎯 3. “A Loss with Omar” — what is a good loss?
A “good loss” always has 3 elements:
✓ Entry based on a valid setup
✓ A clear, fixed stop loss
✓ Immediate exit when proven wrong
No hope. No negotiation.
👉 A correct loss is still a good trade
💥 4. The biggest mistake: judging outcomes instead of process
Beginner traders ask: “Did this trade win?”
Professional traders ask: “Was this trade executed correctly?”
A trade can be:
A loss with proper execution → still a long-term edge
A win with poor execution → a hidden risk
👉 Results are short-term
👉 Process defines the long-term outcome
🚀 5. A simple truth — but hard to follow
You don’t need to win every day.
You don’t need to be right all the time.
You only need:
→ When wrong: lose small
→ When right: let it run
And most importantly:
👉 If the trade is wrong — exit. No negotiation.

Why Advanced Volatility Channels Repaint Your Account to ZeroOpen any retail charting platform, and you will eventually stumble upon the Holy Grail of custom indicators. They usually come wrapped in dense academic jargon—terms like Dimensional Analysis, Isotropic Coordinate Systems, or Multi-Scale Finite-State Machines.
They promise to solve the inherent noise of the market by normalizing price action and drawing perfect, algorithmically fitted trend channels that catch every major swing.
Historically, the charts look flawless. The angles are clean. The breakouts are precise.
The Illusion: On historical data, complex algorithms appear to perfectly frame the market structure. Live, they will systematically dismantle your account.
Today, we are going to look under the hood of these ultra-complex, multi-scale channel indicators, strip away the physics terminology, and expose the mathematical illusion keeping retail traders trapped.
The Illusion of Normalized Angles
The core selling point of these advanced tools is often the normalization of price. The argument goes: a 30-degree angle on a 5-minute chart is visually arbitrary, so we must normalize price by realized volatility (often citing robust models like the Yang-Zhang estimator) to create a dimensionless space.
Mathematically, dividing log-returns by volatility (Z-scoring) is a valid way to normalize data. Institutional quants do it constantly to compare cross-asset momentum.
But here is the retail trap: Normalizing the Y-axis does not predict the X-axis.
Creating a dimensionless space makes the chart look uniform, but it does absolutely nothing to generate forward-looking alpha. It simply changes the scale of the past. The danger arises when this normalized data is used to draw structural channels.
The Anatomy of Hindsight Bias
Let’s look at how these algorithmic channels are actually drawn.
To create a clean trend channel, the logic typically identifies a trending segment and then fits boundaries to the extremes, connecting the Lowest Low to the Highest Low to form support, and the Lowest High to the Highest High to form resistance.
Read that carefully.
How do you mathematically identify the Highest High of a trend? You can only define a peak after price has fallen away from it. You can only identify a Highest Low after the market has rallied away from it.
The Reality: A line drawn from a Highest High requires future data to exist. In a live market, this boundary does not exist at the moment of execution.
This means the beautiful, parallel channel lines you see on the historical chart were drawn in hindsight.
In a live execution environment, these indicators suffer from what developers call boundary repainting. If you are in a live downtrend, the lower channel boundary will continuously recalculate and steepen as new lows are made. It looks like it perfectly contained the trend yesterday, but today, the line is a ghost.
You cannot automate a trade based on a support line that only mathematically exists after the bounce has already occurred.
The Consensus Lag Penalty
To filter out the noise caused by this boundary shifting, these scripts often employ Multi-Scale Analysis, running the same logic across 5 or 6 different block periods (often using prime numbers to avoid harmonic overlap, which sounds incredibly sophisticated).
When 5 out of 6 scales agree, the dashboard flashes a Confirmed Breakout or a Structural Consensus.
What is the quantitative reality of waiting for 6 different geometric mean blocks to align?
Catastrophic lag.
By the time a micro-scale, a mid-scale, and a macro-scale all definitively confirm a structural shift using lagging geometric means, the institutional volume that initiated the move has already taken profit. You are entering exactly where the smart money is providing liquidity to exit.
The Reality of Execution
Complexity is not an edge. Wrapping a lagging, hindsight-fitted channel in the terminology of fluid dynamics does not make it a robust trading system.
If an indicator looks like it perfectly framed the market historically, ask yourself: Did it know that boundary existed at the time of the live print?
Institutional execution doesn't rely on drawing perfect diagonal lines. It relies on executing statistical probability in the noise of the live edge, without waiting for a repainting channel to give permission.
Stop buying visual comfort. Start demanding mathematical reality.

Why Timeframes Matter? GoldspireVision ReviewsWhy Timeframe Is the Foundation of Trading
Many beginners believe profitable trading depends on indicators, signals, or a secret strategy.
Reality is stricter.
A trader can make the correct forecast and still lose money because the trade was taken on the wrong timeframe. Markets can move in several directions at once. A pair may look bullish on H1, bearish on M5, and completely sideways on D1. All three views can be correct at the same time.
That is why timeframe analysis is not optional. It is the base of structured trading.
What Is a Timeframe?
A timeframe is the scale of the chart.
Think of it like a map. A world map shows the global picture, while a street map shows small details. Both are useful, but they answer different questions.
In trading:
M1–M5 shows fast movement and noise.
M15–H1 shows intraday structure.
H4–D1 shows medium-term trends.
W1–M1 shows the global market picture.
The larger the timeframe, the stronger its influence. A weekly structure carries more weight than a 15-minute candle.
Why Beginners Lose Money
A beginner may see strong movement on M5 and enter long immediately.
But on H1, price may already be at resistance. On D1, the broader trend may be bearish.
The result is simple: the small timeframe entry looks good, but the higher timeframe context rejects it.
The trader was not completely wrong. The analysis was incomplete.
How Experienced Traders Read Charts
A beginner sees a fast move and thinks, “The trend is starting.”
An experienced trader asks:
Why did price move?
Where is it on H1?
Is it near resistance or support?
What does D1 show?
Does the higher timeframe support this trade?
This difference separates emotional trading from structured analysis.
The Correct Approach: Top to Bottom
Professional analysis usually starts from higher timeframes and moves down.
W1 and D1 define the global direction.
H4 and H1 show structure and key zones.
M15 or M5 can help refine the entry.
This is called multi-timeframe analysis.
For example:
D1 shows an uptrend.
H1 shows a pullback into support.
M15 gives a clean entry signal.
That is a much stronger trade than entering only because M5 looks bullish.
Choosing the Right Timeframe
Every trader needs a timeframe that fits their personality and routine.
Scalpers usually work on M1–M5. This is fast, stressful, and difficult because the trader competes with algorithms and short-term noise.
Day traders often use M15–H1. This offers a balance between opportunity and control.
Swing traders usually focus on H4–D1. This style has fewer trades, less noise, and more time for decision-making.
The number of trades does not matter. Quality matters.
One well-planned trade can be better than 100 impulsive entries.
The Golden Rule
Timeframes should support each other, not fight each other.
A strong trade may look like this:
D1 shows an uptrend.
H1 shows a pullback into support.
M15 gives the entry.
This creates alignment.
A weak trade happens when a trader buys on M5 while H1 and D1 show resistance or bearish pressure.
That is how many beginners get trapped.
Common Beginner Mistakes
Many new traders watch too many timeframes at once. This creates confusion.
Others enter on a lower timeframe against the higher timeframe trend. Some change their style every day. Others trade based on mood instead of structure.
These habits create inconsistent results.
A timeframe is not just a chart setting. It defines your trading style, psychology, risk level, and decision-making process.
Final Thoughts
Timeframe analysis helps traders understand where they are in the market. It reduces random decisions and improves trade selection.
The goal is not to predict every move. The goal is to trade in the right context.
This is the type of core trading principle often discussed in educational content around GoldspireVision Reviews. A better understanding of timeframes can help traders filter noise, avoid emotional entries, and build a more structured approach to the market.

Trade Like a Pro with IchimokuComplete and Professional Ichimoku Cloud Guide
The Ichimoku Cloud is a complete trend analysis system, not just a simple indicator. Its purpose is to help traders instantly understand whether the market is bullish, bearish, ranging, overextended, or trading around fair value — all in one view.
The most important principle is this:
Ichimoku is not designed to catch reversals; it is built to trade in the direction of the trend.
1. What Does Ichimoku Actually Tell Us?
With Ichimoku, you can quickly determine:
Whether the market is trending or ranging
Whether buyers or sellers are in control
Whether price is interacting with dynamic support/resistance
Whether price is overextended or still has room to move
Whether continuation is more likely than indecision
2. Core Components of Ichimoku
Tenkan-sen (Conversion Line)
The fastest component of Ichimoku, representing short-term market behavior.
When Tenkan slopes upward, short-term momentum is bullish.
When it slopes downward, short-term pressure is bearish.
However, Tenkan alone is not a trading signal — it’s mainly used to measure momentum speed.
Kijun-sen (Base Line)
More important than Tenkan, Kijun represents the medium-term equilibrium of the market.
In an uptrend, Kijun acts as dynamic support.
In a downtrend, it acts as dynamic resistance.
If price moves too far away from Kijun, the market may be overextended and prone to a pullback.
Senkou Span A
One of the two cloud boundaries. It reacts faster and is projected forward.
When Span A is above Span B → bullish cloud
When Span A is below Span B → bearish cloud
Senkou Span B
The slower boundary of the cloud, typically acting as a stronger support/resistance level.
Because it moves slower, it requires stronger momentum to break.
Kumo (Cloud)
The most important element of the system — the area between Span A and Span B.
It defines market conditions:
Price above the cloud → bullish trend
Price below the cloud → bearish trend
Price inside the cloud → ranging / neutral market
A thick cloud means strong support/resistance.
A thin cloud suggests a higher probability of breakout.
Chikou Span (Lagging Line)
Represents the current price plotted 26 periods back.
Its main role is to confirm market structure.
Above past price → bullish confirmation
Below past price → bearish confirmation
Inside past price → unclear / weak structure
3. The Core Philosophy: Market Equilibrium
Ichimoku is not just about signals — it’s about balance.
Price near the cloud or Kijun → near equilibrium
Price far from the cloud → out of equilibrium (overextended)
Price inside the cloud → fair value / indecision
Always ask:
Where is price relative to the cloud and Kijun?
4. Reading Trend with Ichimoku
Healthy Uptrend
Price is above the cloud
Future cloud is bullish
Tenkan is above Kijun
Chikou is above past price
Pullbacks are bought near Kijun or the cloud
In this case, focus on buying opportunities — not selling.
Healthy Downtrend
Price is below the cloud
Future cloud is bearish
Tenkan is below Kijun
Chikou is below past price
Rallies are sold near Kijun or the cloud
Focus on selling opportunities.
Ranging / Indecision Market
Price inside the cloud
Cloud is thin and twisting
Frequent Tenkan/Kijun crosses
Chikou stuck within price
In this environment, Ichimoku signals are weak — the best move is often to wait.
5. Key Ichimoku Signals
1. Cloud Breakout
When price breaks above the cloud → bullish signal
When price breaks below the cloud → bearish signal
Stronger if:
Future cloud confirms the direction
Chikou is clear and aligned
2. Tenkan / Kijun Cross
Tenkan above Kijun → bullish
Tenkan below Kijun → bearish
Signal strength depends on location:
Above cloud → strong bullish
Inside cloud → weak/neutral
Below cloud → weak bullish
Reverse applies for bearish signals.
3. Kijun Pullback
One of the most reliable setups.
In an uptrend, price often pulls back to Kijun → potential buy zone.
In a downtrend, price rallies to Kijun → potential sell zone.
4. Cloud Pullback
The cloud acts as a dynamic support/resistance zone.
In uptrends → pullbacks to the cloud can offer buying opportunities.
In downtrends → pullbacks to the cloud can offer selling opportunities.
6. Complete Long Strategy
Conditions:
Price above the cloud
Future cloud bullish
Tenkan above Kijun
Chikou above past price
Price not overextended
Entry:
On pullback to Kijun, Span A, or cloud edge
Stop Loss:
Below signal candle, Kijun, or cloud
Target:
Minimum 2:1 reward-to-risk
7. Complete Short Strategy
Conditions:
Price below the cloud
Future cloud bearish
Tenkan below Kijun
Chikou below past price
Price not overextended
Entry:
On pullback to Kijun, Span A, or cloud edge
Stop Loss:
Above signal candle, Kijun, or cloud
Target:
Minimum 2:1 reward-to-risk
8. Overextended Market Concept
A common mistake is entering after a strong move.
If price is far from the cloud and Kijun, the market is out of balance.
This increases the risk of a correction.
In uptrends → buy near support, not at highs
In downtrends → sell near resistance, not after sharp drops
9. Best Timeframes
Ichimoku works best on mid-to-higher timeframes.
Daily → best for trend
4H → strong for swing trading
1H → usable but noisier
Lower than 1H → less reliable
Professional approach:
Use higher timeframe for bias
Use lower timeframe for entry
Example:
Daily → trend direction
4H → setup
1H → entry
10. Combining Ichimoku with Price Action
Ichimoku becomes more powerful when combined with price action.
In an uptrend:
Price above cloud
Pullback to Kijun
Bullish candle (pin bar, engulfing, breakout)
In a downtrend:
Price below cloud
Pullback to Kijun/cloud
Bearish rejection or structure break
This adds confirmation and improves entry quality.
11. Critical Mistakes to Avoid
Trading inside the cloud
Relying only on Tenkan/Kijun cross
Ignoring Chikou
Trading against the cloud
Entering when price is overextended
Using Ichimoku for scalping
Expecting reversals from a trend system
Trading without risk management
12. Professional Entry Checklist
Before entering a trade:
Is price above, below, or inside the cloud?
Does the future cloud confirm the direction?
What is the Tenkan/Kijun position?
Is Chikou free or blocked?
Is price near equilibrium or overextended?
Does higher timeframe agree?
Is stop loss defined?
Is reward-to-risk at least 2:1?
If several answers are unclear → do not trade.
13. Final Summary
Ichimoku is a complete trend-following system.
It tells you:
When to trade
Where to enter
Where the market structure stands
Simple rule:
Above cloud → look for buys
Below cloud → look for sells
Inside cloud → wait
Advanced rule:
Trade with the trend, but enter near equilibrium — not when price is already stretched.

Global Trading Hours Explained by GoStoneMax Reviews In the context of GoStoneMax Reviews, understanding how financial markets function requires more than analyzing price levels, entry patterns, or technical zones. One of the most critical yet often underestimated factors influencing price movement is time.
Market behavior is not random. Price movements tend to occur during specific periods when liquidity enters the market. This concept is commonly referred to as time-based market structure or time theory. It emphasizes that not all trading hours carry the same level of importance or opportunity.
There are periods when the market remains relatively inactive, where price action becomes less structured and more unpredictable. In contrast, there are periods when liquidity significantly increases, resulting in more technical and directional movement. These fluctuations are directly linked to global trading sessions.
Price formation in liquid financial instruments is primarily driven by institutional participants such as banks, hedge funds, and large financial organizations. These entities operate within defined working hours, aligned with major financial centers and regional time zones. As a result, market activity varies depending on which global markets are open and actively trading.
From this perspective, it becomes clear that each financial instrument has optimal trading periods. These periods are determined by the geographical concentration of market participants and the volume of liquidity available at specific times.
For example, certain assets may exhibit stronger activity during Asian trading hours, particularly when influenced by regional economic factors. Conversely, instruments such as EUR/USD or major indices often show increased volatility during European or U.S. sessions, when larger volumes of institutional capital enter the market.
In the framework of GoStoneMax Reviews, recognizing these time-based dynamics allows traders to operate during periods of higher efficiency. This reduces exposure to low-liquidity environments where price movement tends to be erratic and less reliable.
To apply this understanding in practice, traders must analyze trading sessions. These sessions represent the operating hours of the major financial centers and are traditionally divided into three primary categories:
Asian Session (Tokyo): 00:00 – 08:00 GMT
European Session (London): 07:00 – 16:00 GMT
American Session (New York): 12:00 – 21:00 GMT
Each session contributes differently to market structure and intraday price development.
The Asian session is generally characterized by lower volatility and range-bound conditions. During this period, the market often forms a consolidation range, establishing liquidity levels that become reference points for later sessions. While directional movement may be limited for some instruments, certain assets such as gold or Asian indices may still exhibit notable activity.
The London session marks a significant increase in market participation and liquidity. As one of the largest financial hubs globally, London’s opening often initiates the primary intraday movement. Traders frequently observe liquidity sweeps of the Asian range, false breakouts, and the formation of the first directional impulse during this period.
The New York session introduces additional liquidity and volatility, especially during its overlap with the London session. This phase can either continue the directional movement established earlier or trigger a reversal, depending on broader market context and higher-timeframe levels.
Evaluating whether New York will act as a continuation or reversal phase requires analyzing prior session behavior and key liquidity zones. If the market has not yet reached significant higher-timeframe levels, continuation is more likely. Conversely, if those levels have already been achieved, the probability of a reversal increases.
Another important concept within time-based trading is the identification of high-activity periods known as “Killzones.” These are specific time windows within each session where trading volume, liquidity, and volatility reach peak levels.
The Asian Killzone typically occurs during the first hours of the session and is primarily used for establishing the daily range. The London Killzone is considered one of the most significant periods, often generating the highest-quality intraday opportunities. The New York Killzone, particularly during market open, is associated with strong volatility and confirmation or reversal of earlier movements.
In summary, within the analytical framework of GoStoneMax Reviews, time plays a fundamental role in understanding market structure. Recognizing when liquidity enters the market, identifying session behavior, and focusing on high-activity periods can significantly improve trading precision and overall performance.

Master FOMC Trading Like a Pro Before Volatility StrikesWhat'sup traders,
With FOMC just around the corner, this is where most traders make the biggest mistake — they try to predict direction instead of understanding how the market behaves before volatility hits.
In this post, I’ll break down how to approach FOMC like a pro using price action, liquidity, and structure.
1. Market Phase Before FOMC
Before major events like FOMC, the market rarely trends cleanly.
Instead, it shifts into a compression phase after a strong move.
This is exactly what we’re seeing on XAUUSD right now:
Strong sell-off
Followed by consolidation
This is not random, it’s preparation.
2. What Smart Traders Focus On
Professionals don’t care about guessing the news outcome.
They focus on one thing:
Where is liquidity?
Because before any big move, the market needs to:
Take stops
Trigger orders
Create imbalance
3. The Trap Before Volatility
One of the most common FOMC patterns:
Fake breakout before the news
Or immediate sweep right after release
This is where most retail traders get trapped.
If you enter too early → you become liquidity.
4. How I Trade FOMC Like a Pro
Instead of predicting direction, I prepare scenarios:
🔹 Scenario 1 — Sweep Low → Reversal
If price drops below the range and quickly rejects →
That’s a sign liquidity has been taken → I look for buys
🔹 Scenario 2 — Sweep High → Continuation
If price pushes up, traps buyers, then sells off →
I look for continuation shorts
🔹 Scenario 3 — Clean Breakout
If price expands strongly without rejection →
I wait for pullback, not chase
5. The Real Edge
The real edge during FOMC is not prediction.
It’s patience.
Let the market:
Take liquidity
Show its reaction
Then follow the move
If you trade before that → you are gambling
If you trade after that → you are positioning
Final Thoughts
XAUUSD is currently in a compression phase.
Volatility is coming — but direction is not the priority.
Reaction is.
Trade smart. Not fast.

No-Trade Is a Trade. You’re Just Not Tracking It [EmpArchitect]Most traders only record the trades they took.
That misses half the decision process.
Every session has two outcomes: action and refusal. Entering is a decision. Passing is also a decision. Both affect your equity curve, but only one usually gets written down.
That creates a distorted review process. You study your wins. You study your losses. But you rarely study the trades you refused to take.
A skipped trade that would have lost is not “nothing.” It protected capital. It protected attention. It kept you available for a cleaner opportunity.
A skipped trade that would have won is not automatically a mistake either. If it broke your rules, it was still a correct decision with a favorable outcome you were not entitled to take.
That distinction matters.
Without tracking skipped trades, you cannot tell whether your problem is poor execution or poor selection. You only see the trades that passed your filter. You never study the filter itself.
This is why many traders keep changing strategies when the real issue is lower in the process. They do not need more entries. They need better evidence about what they are refusing, why they are refusing it, and whether those refusals are improving their results.
Most people think discipline means managing a trade well after entry.
Often, discipline is never being in the trade at all.
A no-trade decision still has P&L. You just rarely record it.

2 Simple Strategies to Trade US30 Index with CRT SMC
I will teach you 2 simple strategies for trading Candle Range Theory on US30 Index with SMC.
I will show you the efficient CRT price models and explain different ways to identify a profitable confirmation entry signal.
The core of profitable CRT trading is the selection of a proper candlestick.
No matter what entry strategy you will use, the rules and conditions of a candle that you will trade will be the main element.
So let me start with explaining how I pick the perfect candle.
The first important condition to be met is a strong imbalance.
Our perfect candle will be an i mbalance bullish or bearish candle
with a large body and relatively small wicks.
The second condition is a trap and a liquidity grab beyond the range of that candle after it closes.
That is the example of such a candle on US30 index on a 4H time frame.
We see a strong selling imbalance candle with a large body.
After this candle closed, a trap below its low occurred.
We will trade ranges of only such candles.
Once these 2 conditions are met, you can look for entry signals with these 2 strategies.
Strategy 1
With this strategy, we will use the same time frame for the identification of an entry signal.
I suggest waiting for the start of a consolidation and a weak momentum after a trap.
The price will likely start coiling within a horizontal range.
In this range, an accumulation of trading volumes will likely occur.
Your signal to buy will be a breakout and a candle close above a resistance of the range.
That will confirm that the accumulation is completed.
TP will be a couple of pips below a candle opening level.
Stop loss will be below the low of the trap.
Strategy 2
With this strategy, we will use lower time frame analysis for the identification of an entry signal.
If we spotted a candle for CRT trading on a 4H, we will look for a signal on an hourly time frame.
On an hourly time frame, we will need to do a market structure mapping and search for a bullish change of character CHoCH as an entry signal.
It will confirm a violation of a minor bearish trend and signify a strength of the buyers.
Entry will be after a pullback on a retest of a broken level of the last lower high.
Stop loss will be below the lows of the trap.
Take profit will be based on a 4H candle opening level.
Strategies' Strengths & Weaknesses
Entry strategy on the same time frame is way easier and provides a higher accuracy.
At the same time, a lower time frame confirmation will provide an entry signal earlier , giving a way better reward to risk ratio.
Also, remember that with the analysis of multiple time frames, there will always be a higher chance of an occurrence of a signal and a consequent entry.
Personally, I prefer a top-down analysis entry strategy for CRT trading.
If you are a beginner, though, start with a single time frame analysis as it is more straightforward.
The final result of the setup that we analysed on US30 is the following:
While an hourly time frame analysis provided a perfect entry confirmation, a 4h time frame analysis did not provide an entry opportunity as the price did not retest a broken resistance.
Try both entry strategies and pick the one that is more suitable for you.
Thanks for reading.
❤️Please, support my work with like, thank you!❤️
I am part of Trade Nation's Influencer program and receive a monthly fee for using their TradingView charts in my analysis.

Strategy Isn’t the Problem. Lack of Data ruins discipline.Today it's gonna be very quick. Everyone says fix your mindset, Fix you trading psychology...
Yeah , but how? How can you be disciplined from now on? How can you stop fearing opening a trade and be confident ? And finally how can you stop your need to trade everyday or even every session.
Answer to all of this is simple = Statistical data.
Yes strategy is important part but I can give best strategy on the world to the two traders and we will see two totally different results. And it will be because of confidence in the method.
But lets take if from the scratch.
There’s no way to stop fearing losses, being greedy, or overtrading by just magically “fixing your mindset.” These affects your results.
🧪 Fear – Not executing your setup when it appears because the last two trades were losses. Closing trades early because you fear it will come back to entry or hit SL — which leads to doubting your strategy and jumping to another one.
🧪 Greed – Setting unrealistic targets and not taking profits at the right time.
Trading sizes so big that you check your phone every 3 minutes. Gambling. Trying to pass prop firm challenges in a few trades instead of consistent work.
🧪 Revenge Trading – Trying to make your money back quickly in bad trading conditions. Trying to prove to the market that you’re right. Fighting with your ego.
🧪 Overtrading – Forcing trades just for the sake of doing something. Feeling like you need to trade every day — a mindset from normal jobs where we’re paid for effort.
So how can you avoid these sings and mainly overtrading? Backtesting and Journaling
📈 Backtesting
Backtesting converts your strategy from an idea into a quantified system. You actually don't have a trading plan and strategy if you don't have statistical data, but once you do a 300 backtest you will 1. You define your real edge
* Win rate (% of trades hitting TP)
* Risk-to-reward (e.g. 1:2 vs 1:1)
* Expectancy (average return per trade)
* How often your setups occur
2. You understand drawdowns before they happen
* How many losses in a row is normal (e.g. 5–7)
* Maximum historical drawdown
* Recovery time
3. You filter A+ Setups vs noise
* You’ll see which setups actually perform (e.g. CLS Model 1 vs Model 2)
* You eliminate low-quality trades statistically, not emotionally
4. You build execution rules
* When to enter (time + condition)
* When NOT to trade
* Optimal sessions / days (you already emphasize Tue–Wed volatility (data-backed)
📝 Journaling
Trading alone is random experience. Journaling structures it and will give you mirror of your execution and mistakes. 1. Turns Experience Into Data
* You track what actually works (CLS models, sessions, pairs)
* You see patterns: which setups produce returns vs noise
* You stop relying on memory (which is biased)
2. Exposes Your Real Mistakes
* Entered too early (no confirmation)
* Ignored higher timeframe bias
* Took B setups instead of A+
3. Builds Execution Discipline
* You hesitate before breaking rules
* You focus on clean execution, not excitement
* You start trading your plan, not your emotions
4. Separates Process From Outcome
* “Did I follow my model?” instead of “Did I win?”
* “Was this valid CLS setup?” instead of “Could I have made more?”
🧠 Importance of strategy
I only suggest you try to keep it as much mechanical as possible, without subjective diagonal lines and patterns. You need to have approach with fixed criteria and rules for Entry, SL and TP. So you can measure performance and statistical data. Only this way you can improve over time and control your emotions as fear and greed. How?
Let's say you started doing journaling and you have backtested your strategy. You got your statistical data. Lets have a look how it can help you with traders sins.
🧪 Fear
Why would you fear opening the next trade after a loss or closing early, if you know that on average you win 65 out of 100 trades? Distribution is random, but with a positive win rate, you win over time. Why would you close early if you know that your TP was hit in 75 out of 100 ?
🧪 Greed
Why would you set unrealistic targets when your statistics already show what RR is most profitable for you? And why would you gamble big lot sizes if you know you can lose 35 trades out of 100? It doesn't make sense to gambler right?
🧪 Revenge Trading
Why do it, if you know losses are part of the process and that if you just stick to the plan, you’ll win long-term? Why your statistics says so. You know how your A+ Setup looks like, when stopped out why re-entering again if setup is not valid.
🧪 Overtrading
Why trade every day if your A+ setup doesn’t occur every day?
If your data says the best setups occur 3 times per week, why force it?
Why risk extra trades if you already made profit or if you didn’t perform well this week, why gamble it all on Friday?
See ?Once you got your trading plan backed by backtested statistical data is solution to trading mindset / psychology. There is no shortcut you must do it.
David Perk

Where Andrews Meets GannThe Premise
Two lineages, one geometry. Andrews' median line work and Gann's geometric price-time charts converge in the Hyperfork.
Dr. Alan Andrews' Action-Reaction method — Newton's third law applied to price, which Andrews learned from Roger Babson — uses three pivots to draw a median line with action and reaction parallels framing the trend's channel.
W.D. Gann worked with price-time charts and geometrically scaled charts — the Square of Nine and the Hexagon Chart, etc., which, in my understanding, aim to model the expansion and contraction of price and time.
I had never seen the two come together until I built the Hyperfork.
The Discovery
The Hyperfork extends Andrews/Mikula's Superpitchfork — multiple action-reaction lines layered over the same three pivots. When those lines surface, a two-dimensional hexagon emerges within the Hyperfork. Viewed differently, the same hexagon reads as a cube.
That was the moment. The hexagon-as-cube is the connection — the first time I saw Andrews' median geometry and hexagonal geometry coexist on the same chart.
The Research Direction
If the cube is the unit, the next question is what fills it.
Each cube cell can contain 13 reference points: 1 center, 6 on the outer ring at the cell tips, and 6 on the inner ring forming a nested hexagon at half scale. Connect every pair of nodes, and the figure becomes part of my attempt to produce a Metatron's Cube — a network of nodes and chord relations.
Where Andrews anchors a single median per fork, the lattice surfaces every pairwise chord between every node — a more complete relational map of the same three pivots.
What I'm Exploring
Whether price interacts meaningfully with the lattice and its nodes. Whether the outer ring marks macro pivot candidates. Whether the inner hexagon contains a higher-density confluence zone. Whether the chord crossings function as time-price reference points.
The main question I want to answer is: Does Andrews' 80% rule apply throughout other parts of the lattice? If price tends to return to the parent median about 80% of the time, does this statistical property hold at every cube cell — including each local median axis, nested hexagon, and chord intersection?
Open questions, not claims. This is a research direction, not a method.
Open questions, not claims. This is a research direction, not a method.
Setup
For reproducibility on the chart shown:
Pitchfork type: Modified Schiff
Price scale: Logarithmic
Three pivots picked from major swing points. Everything else is default.
Reference & Lineage
Built on the open-source Hyperfork Matrix . The 13-node Metatron lattice is a research-stage extension; this idea timestamps the direction.
Lineage: Babson → Andrews/Schiff → Mikula → here. Patrick Mikula's The Best Trendline Methods of Alan Andrews and Five New Trendline Techniques extended Andrews' framework and is the direct foundation for this research
